Recipes

  • Tournedos a l'Occitane

    Tournedos a l'Occitane

    This is a dish for a special occasion.


    Neither fast, nor inexpensive, Tournedos a l’Occitane is worth every one of your precious moments and hard-earned dollars.
    It is based on a Madeleine Kamman’s recipe from the excellent In Madeleine’s Kitchen. Kamman is a terrific writer; she leaves nothing to chance either with basic information or the recipes themselves which can often run to a few pages.
    You can prepare the various parts of the dish ahead of time. Make the butter first as that will keep well in the fridge. I lashed out and bought French Lescure butter, seasoned with sea salt. After sampling a little piece I could suddenly see why fresh garden radishes spread with best butter is a French classic. Kamman’s original recipe uses Roquefort in the savoury butter but my Saint Agur blue cheese substitution was so lovely that it will become a permanent adaptation. Saint Agur is a particularly creamy and quite mild blue cheese.
    The steaks need to marinate overnight and this becomes the first building block of the sauce. Flavour is added, layer upon layer, resulting in a few precious tablespoons of the most divine chocolate coloured sauce. Kamman’s technique in making sauces is based on browning the trimmings of the meat in the dish and then simmering these trimmings with stock before straining and reducing to a glaze. The butcher having deftly trimmed my piece of fillet steak, I bought a slice of oyster blade extra and marinated that along with the fillet steaks.
    Occitania, incidentally, culturally occupies the south of France, northern Spain and parts of northwest Italy.

    The Recipe

    Tournedos a l’Occitane (serves 4)

    For the walnut and blue cheese butter:
    150g finest quality salted butter – Lescure is excellent
    80g Saint Agur blue cheese
    3 tbsp walnuts, fried in olive oil until golden, drained
    Mix together the softened butter and cheese. Taste and add more cheese if you like.
    Reserve 4 of the best looking walnuts for garnish. Chop the rest and add to the butter. Mix well, shape into a log and refrigerate until needed.

    Steaks and sauce:
    4 pieces fillet steak cut 2.5cm thick and then flattened slightly
    1 slice oyster blade steak
    2 cups full-bodied red wine
    8 juniper berries, crushed
    4 cloves garlic, crushed
    half onion, chopped roughly
    parsley stems, chopped
    1 bay leaf, fresh or dry, broken into a couple of pieces
    1 tsp thyme leaves
    1 tbsp butter
    two-thirds cup beef or veal stock
    Mix together the wine, juniper, garlic, onion, parsley, thyme and bay leaf. Bring to a boil, simmer for 2 minutes and then allow to cool completely before pouring over the steaks. Cover well and refrigerate overnight. The next day take the steaks from the marinade. Pat dry and remove any pieces of marinade clinging to the meat. Pop the fillet steaks back in the fridge. Strain the marinade, reserving both the liquid and vegetables. Pat the vegetables dry. Cut the oyster blade into small pieces.
    Heat the butter in a fry pan. Brown the oyster blade. Add the marinade vegetables and continue to saute for a few minutes. Pour over the marinade liquid. Cook until it is reduced to about half a cup. Strain through a muslin-lined sieve. Discard meat and vegetables.
    Place marinade reduction in a saucepan. Add the beef or veal stock and boil until the sauce is reduced by about half. If you think the sauce looks a little thin, thicken very slightly with cornflour/water mix. Just before serving, whisk in a couple of tablespoons of walnut and cheese butter. Check for seasoning.
    Meanwhile, oil and season the fillet steaks and saute for a couple of minutes on each side until cooked to your preferred level of doneness – two minutes each side = medium rare. Rest in a warm place.

    To serve:
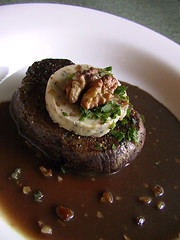
    Place a fillet steak on each plate. Top with a disc of the butter. Grind over some pepper and pop a walnut half on top. Sprinkle with a little parsley. Pour the sauce around. Serve with a green salad or sautéed mix of green vegetables, red peppers and zucchini. Steamed kipfler or pink-eye potatoes would also go well.
    Continue reading
  • Piquant & spicy crostini

    Piquant and spicy Italian spread

    This irresistible spread comes from Carol Field’s equally irresistible Italy in Small Bites.


    Is it possible to imagine anything more pleasurable than sampling the tastes of Italy, morsel by divine morsel?
    Cooking my way through Field’s collection of merende or between-meals-snacks and appetizers has been a very slow process as I can’t get past the Irresistible Spicy Crostini. The spicy Roman crostini also look tempting – olive oil and red wine vinegar with parsley, basil, anchovies, garlic and chilli flakes with breadcrumbs to thicken – but the old favourite continues to tantalise.
    There’s a long list of ingredients so I suggest you double check each time you make it. It is all too easy to forget, say, the capers as I did when making the shopping list. Each ingredient contributes something special to the whole, but it is nigh on impossible to de-pack the individual components, especially after the spread has sat and mellowed for an hour or two. The hard-boiled egg yolk for instance is virtually indefinable but it does add richness and mellows the piquant flavours.
    Small children view this spread with a great deal of suspicion but most over the age of 10 will find it intriguingly delicious.

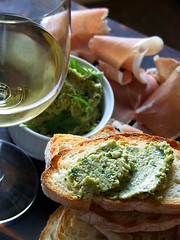
    Serve with a chilled glass of our favourite Soave – 2007 Tommasi Le Volpare Soave

    The Recipe

    Piquant & spicy spread for crostini
    2 slices sourdough or large ciabatta cut 2cm thick, crusts removed
    3 tbsp (scant) red wine vinegar
    6 large anchovy fillets, roughly chopped
    3 tbsp flat leaf parsley, roughly chopped
    3 large cloves garlic, crushed
    3/4 cup pine nuts
    1 tbsp, generous salted capers, rinsed well and drained
    4 very large or 5 small hard-boiled egg yolks
    12 large green olives stuffed with pesto (available at delicatessens), roughly chopped
    freshly ground pepper
    half cup extra virgin olive oil

    Lay the bread on a flat plate and sprinkle with the vinegar. Leave for 10 minutes then squeeze the bread to remove any excess vinegar. Break up the bread roughly and place in a food processor. Add the anchovy, parsley, garlic, pine nuts, capers, egg yolks, olives, pepper and olive oil. Process until it comes together as a spreadable paste but still with some texture. Serve with freshly made crostini.

    For the crostini: slice ciabatta or sourdough baguette, brush with olive oil and toast till golden.

    Continue reading
  • Caramelised figs

    Caramelised figs

    The fig is a very useful plant. Its leaves have protected the modesty of Adam and Eve, as well as a host of naked mythological beings, and the fruit is among the most splendid that nature produces.

    It is ironic that the leaf of the fig should be so used to avoid inflaming passion in viewers of great art, when the fruit of the tree is incredibly sensual to look at as well as eat. Further, the sap of the green parts of the fig is an irritant to human skin; a freshly plucked leaf is hardly the best choice as a covering for delicate parts.

    The fig is one of the first plants cultivated by humans and may even predate wheat and rye. The Romans new several cultivars and even used them to fatten geese for superior foie gras. Figs were considered so valuable and desirable in ancient Athens that there were strict laws to control harvest. The word ‘sycophant’ has its origins in ancient Greek – it literally means ‘showing the figs’ – and was used to refer to anyone who had informed on another for exporting figs (forbidden) or tattling on those who had stolen the fruit of the sacred fig trees.
    Tree-ripened figs picked first thing in the morning, with the chill of the evening still on them, is one of eating’s greatest pleasures. Figs are also incredibly good for you. They’re high in calcium and fibre and are a great source of potassium. The fig has lots of antioxidants and plenty of flavonoids, which have anti-allergenic, anti-inflammatory and anti-cancer properties.

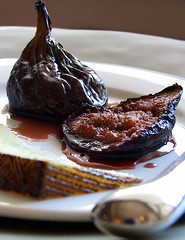
    I cooked most of the figs whole but cut a couple in half to fit them into the baking dish. The halves were really good – extra tasty because the caramel syrup was drizzled directly over the interior.

    Serve with a piece of very good cheddar like King Island Reserve, Spanish Manchego or French Cantal. A glass of Spanish Pedro Ximinez on the side is excellent.

    The Recipe

    Caramelised figs
    large, very ripe purple figs
    water
    caster sugar
    Preheat oven to 230C.
    Dip the figs in water and then roll in caster sugar so that there is a generous coating all over the fig.
    Place the figs standing up in a ceramic dish with sides. You can cut some of the figs in half if you like (see above) to make a neat fit in the dish.
    Bake for about 20 minutes or until the sugar has dissolved on the outside and the fig looks richly brown. The syrup formed in the bottom of the dish should have taken on a caramel quality.
    Remove from the oven, cool, spooning the caramel syrup over the figs as they cool. They will collapse slightly.

    Continue reading
  • Dacquoise with dark fruits

    Dacquoise w dark fruits

    A Dacquoise is a famous French gateau from the town of Dax.

    It is composed of thin discs of nut meringue layered with flavoured butter cream (coffee is popular) or whipped cream and fresh fruits.
    My original idea was to simply sandwich the layers together with home-made blackcurrant jelly and whipped cream. On the morning of Dacquoise production, the fresh blackberries in the fridge pleaded to play a part. This turned out to be a good idea. The blackberries, dotted over each meringue layer, made a handy structure to ‘contain’ the cream and prop up the layer on top.
    You can use any fresh fruit, with or without a complementary jam or jelly. Pureed apricots are also excellent.

    The Recipe

    Dacquoise with dark fruits
    8 egg whites
    pinch salt
    200g caster sugar
    1 tsp vanilla extract or paste
    150g ground almonds
    75g finely chopped, roasted hazelnuts
    blackcurrant jelly preserve (as above)
    whipped cream
    blackberries
    half cup lightly roasted blanched almonds, chopped
    icing sugar
    Preheat oven to 180C. Line 3 trays with non-stick baking paper. Grease the paper and mark a 20cm circle on each.
    Beat the whites with the salt until very stiff. Beating all the while, gradually add the caster sugar and vanilla. Keep beating until the meringue is very thick and shiny. Gently fold in the nuts by hand. Spread the meringue over the marked circles. Bake the meringues for 20 minutes at 180C and then turn down to 150C and bake for a further 10 minutes. They should be nicely brown. Turn the trays as necessary. Let cool a little, invert onto wire racks and carefully peel away the paper. When cool store in an airtight tin with baking paper between the layers.
    To assemble the Dacquoise:
    Place a meringue on a serving plate. Lightly spread blackcurrant jelly over the meringue. No need to be neat. Dot the meringue with whole blackberries. Dollop the cream around the fruit. Spread blackcurrant jelly over a second meringue circle. Place this over the cream and berries. Press down gently. Top the second circle with berries and cream. Pop the third meringue on top. Gently press the chopped almonds into the top. Dust generously with icing sugar.
    You can keep the cake in the fridge. The meringue layers will be deliciously chewy.

    To make the blackcurrant jelly: Place the blackcurrants, stems and all, in a large pot. Cover with water, pop on a lid and cook over very low heat for an hour. Place a strainer over a large bowl. Line the strainer with 2 layers of muslin. Tip the cooked blackcurrants and juice into the muslin. Tie the muslin into a bag (without squeezing) and suspend this bag over the basin (hanging from the knobs of overhead cupboards works well) so that the juice can drip through. Leave for a few hours until the bag has stopped dripping. Measure 1 cup sugar for each cup juice. In a very large pan stir the juice and sugar together just until the sugar has dissolved. Over very high heat boil the mixture until jelly point has been reached. Measure this on a cooking thermometer or watch carefully – when the mixture wants to keep foaming up to the top of the pan, it is ready. (Forget testing it on a saucer – if it jellies immediately it has gone way too far.) Take off heat, remove scum and cool a little. Pour into sterilised jars and cover.

    Continue reading